Managing Bookings
Track, manage, and organize all customer bookings from a single dashboard
Booking List View
The booking list is the central hub for managing all appointments. Navigate to WP Booking System → Bookings in your WordPress admin to access it.
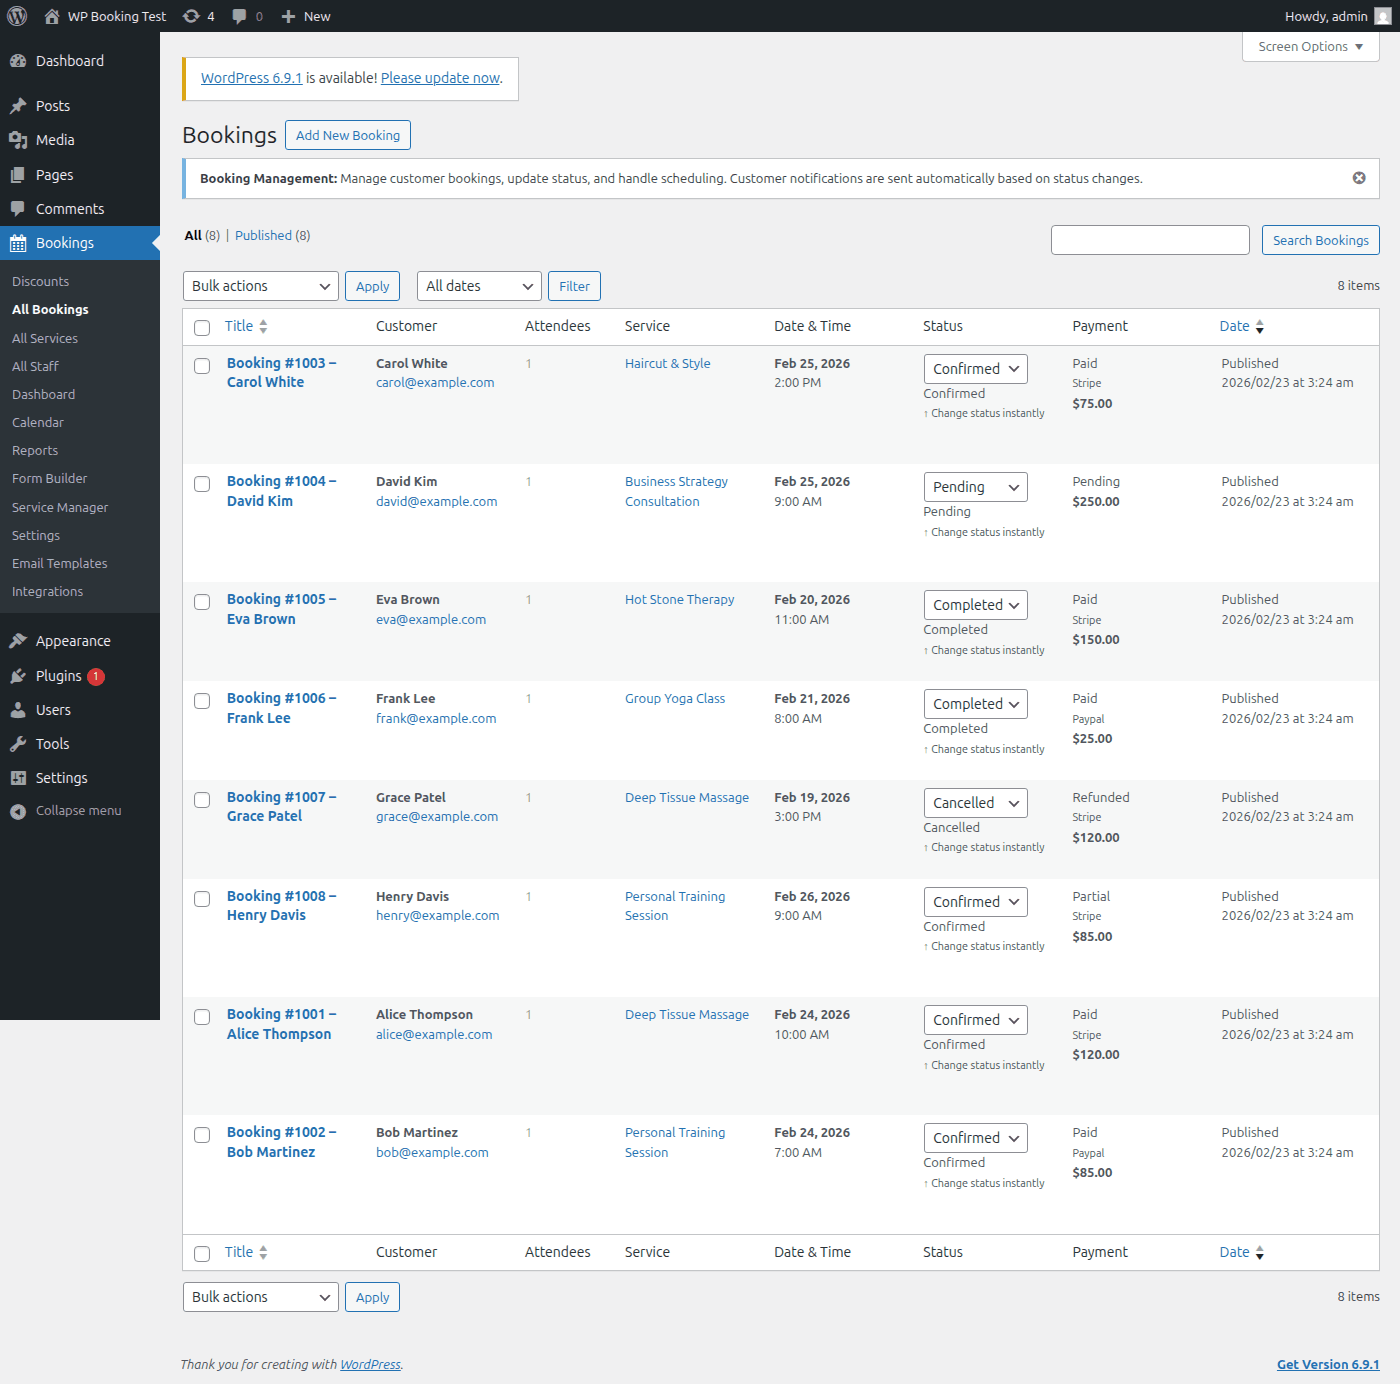
List Columns
| Column | Description |
|---|---|
| Customer | Full name linked to the booking detail screen. Hover to see email and phone. |
| Service | The service booked. Shows service name and assigned staff member. |
| Date / Time | Booking date and start time. Displays in your WordPress timezone setting. |
| Status | Color-coded badge showing the current booking status (Pending, Confirmed, etc.). |
| Payment | Payment status badge and amount. Shows gateway icon (Stripe/PayPal) when applicable. |
| Created | Timestamp when the booking was originally submitted. |
Filtering & Searching
Use the toolbar above the booking list to narrow results quickly:
Tip: Filters can be combined. For example, select "Confirmed" status + "Paid" payment + a date range to see all paid-and-confirmed bookings for a specific week.
Booking Statuses
Every booking moves through a lifecycle represented by five statuses. Understanding when each applies helps you keep your schedule accurate and your customers informed.
The booking has been submitted but not yet approved. This is the default state for new bookings when manual approval is enabled in your settings.
When to use: Any new booking that requires admin review before confirmation. Ideal for businesses that need to verify availability or screen customers before committing a time slot.
The booking has been approved and the customer has been notified. The time slot is now reserved on the calendar and will block other customers from booking the same slot.
When to use: After verifying the booking details and confirming the appointment. If auto-confirm is enabled in settings, bookings skip Pending and go directly to Confirmed.
The appointment has taken place and the service was delivered. This is the final positive state in the booking lifecycle.
When to use: After the appointment has occurred. You can configure auto-completion in settings to automatically mark bookings as Completed after their scheduled end time.
The booking has been cancelled by either the admin or the customer. The time slot is released and becomes available for new bookings.
When to use: When a customer requests cancellation, or when you need to cancel due to staff unavailability. A cancellation notification email is automatically sent to the customer.
The customer did not arrive for their scheduled appointment without cancelling beforehand. The booking is retained for record-keeping and reporting purposes.
When to use: After the appointment time has passed and the customer failed to show up. Useful for tracking no-show rates and identifying repeat offenders. No-show bookings are included in revenue reports if payment was already collected.
Payment Statuses
Payment statuses are tracked independently from booking statuses, giving you granular control over the financial side of every appointment.
| Status | Description | Typical Scenario |
|---|---|---|
| Pending | Payment has not yet been received or processed. | Booking just created; customer chose pay-at-venue; bank transfer awaiting confirmation. |
| Paid | Full payment has been successfully collected. | Stripe/PayPal charge succeeded; admin manually marked as paid after cash payment. |
| Failed | The payment attempt was declined or errored. | Credit card declined; insufficient funds; gateway timeout. Customer should retry. |
| Refunded | The full payment amount has been returned to the customer. | Admin initiated a refund via Stripe/PayPal dashboard or through the booking detail screen. |
| Partial | Only a portion of the total has been paid (deposit collected). | Deposit system enabled; customer paid 25% upfront, remainder due at appointment. |
Warning: Changing a payment status manually does not trigger an actual refund or charge through your payment gateway. To process a real refund, use the Stripe or PayPal dashboard, then update the status in WP Booking System to keep records in sync.
Quick Status Updates
You can change a booking's status directly from the list view without opening the detail page. This is the fastest way to process bookings in bulk.
How to Use the Quick Status Dropdown
- In the booking list, find the Status column for the booking you want to update.
- Click the colored status badge. A dropdown menu appears with all available statuses.
- Select the new status. The change is saved instantly via AJAX — no page reload required.
- The customer receives an automatic email notification reflecting the new status (if email notifications are enabled in settings).
Tip: The quick status dropdown also works for payment statuses. Click the payment badge in the Payment column to switch between Pending, Paid, Failed, Refunded, and Partial without leaving the list.
Booking Details
Click any booking in the list (or click Edit from row actions) to open the full booking detail screen. This page contains everything about a single booking organized into meta boxes.

Customer Information
- •Full name (first + last)
- •Email address
- •Phone number
- •Customer notes / special requests
Service Details
- •Service name
- •Assigned staff member
- •Booking date
- •Start time and end time
- •Duration (auto-calculated)
Pricing & Payment
- •Service price
- •Discount / coupon applied
- •Tax amount
- •Total amount due
- •Payment status and method
Admin Notes
- •Internal notes (not visible to customer)
- •Status change history
- •Payment transaction ID
- •Custom field values
Tip: All fields on the booking detail screen are editable. Make your changes and click "Update Booking" to save. The customer will receive a notification email if the date, time, or status changed.
Row Actions
Hover over any booking in the list to reveal quick-action links beneath the customer name. These one-click actions let you manage bookings without opening the detail screen.
Confirm
Moves a Pending booking to Confirmed status. Sends a confirmation email to the customer with the appointment details.
Cancel
Cancels the booking and frees the time slot. The customer is notified via email. If payment was already collected, you will be prompted to handle the refund.
Mark Complete
Sets the booking to Completed. Use this after the appointment has taken place. Helpful for triggering post-appointment follow-up emails or review requests.
View
Opens the booking detail screen in read-only preview mode.
Edit
Opens the booking detail screen in full edit mode so you can modify any field.
Trash
Moves the booking to the trash. Trashed bookings can be restored within 30 days before permanent deletion.
Bulk Actions
When you need to update multiple bookings at once, bulk actions save significant time.
How to Use Bulk Actions
- Select bookings by clicking the checkbox to the left of each row. Use the top checkbox to select all visible bookings at once.
- Open the "Bulk Actions" dropdown at the top of the list.
- Choose one of the available actions:
- Mark as Confirmed — Approve all selected pending bookings
- Mark as Completed — Close out finished appointments
- Mark as Cancelled — Cancel all selected bookings
- Mark as Pending — Revert bookings back to pending review
- Mark as No-Show — Flag customers who did not attend
- Click "Apply". A confirmation dialog appears showing how many bookings will be affected.
- Confirm the action. All selected bookings are updated and customers receive appropriate email notifications.
Warning: Bulk cancellation sends cancellation emails to every affected customer. Double-check your selection before applying to avoid unintended cancellations.
Creating Bookings Manually
Admins can create bookings on behalf of customers directly from the WordPress dashboard. This is useful for phone bookings, walk-ins, or VIP customers.
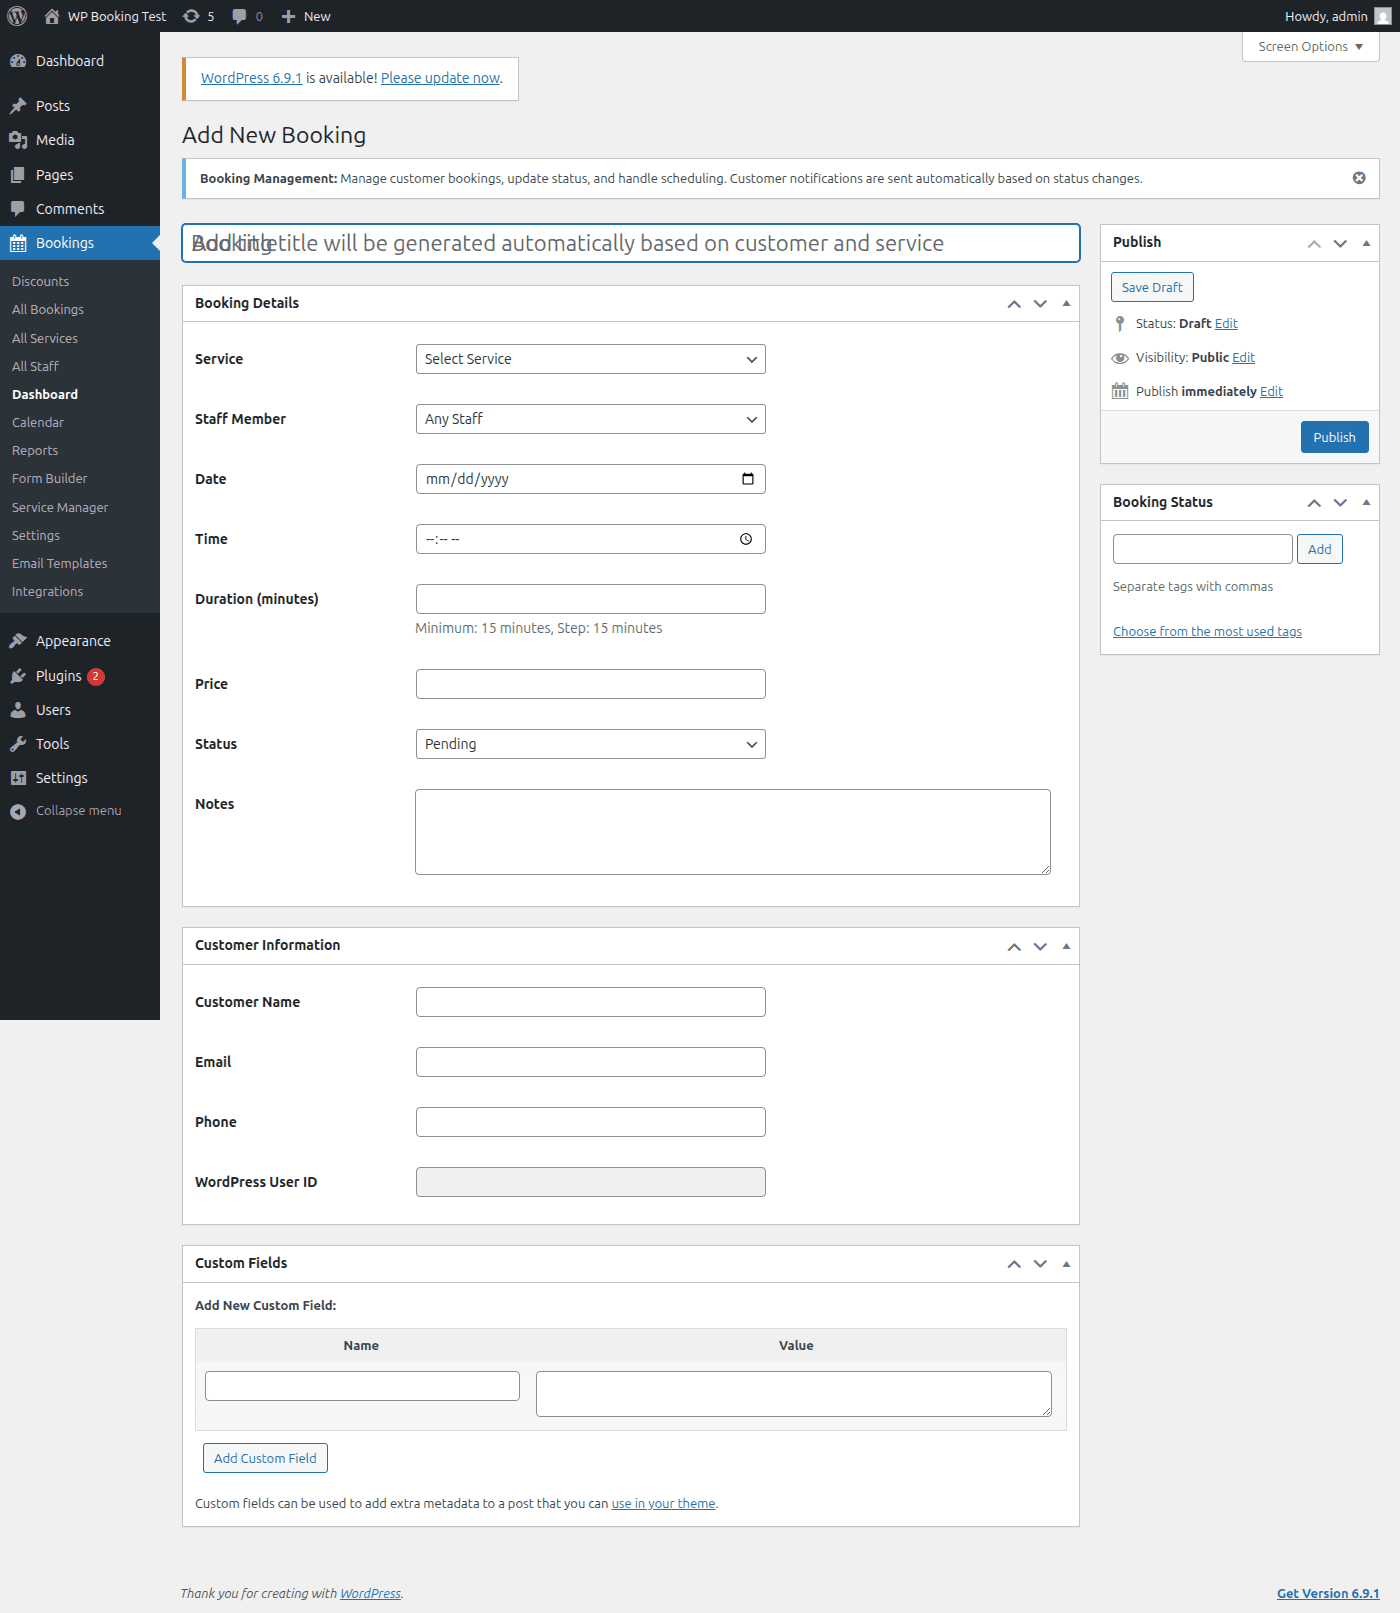
Step-by-Step: Add a New Booking
- Navigate to WP Booking System → Bookings → Add New.
- Select a service from the dropdown. The available staff, duration, and price fields will auto-populate based on the service configuration.
- Choose a staff member or leave it set to "Any Available" for auto-assignment.
- Pick a date from the calendar widget. Only dates with available slots will be selectable.
- Select a time slot from the available options. Slots already booked by other customers are greyed out.
- Enter customer information:
- • First name and last name (required)
- • Email address (required — used for confirmation emails)
- • Phone number (optional)
- Set the booking status — admin-created bookings default to Confirmed, but you can set them to Pending if needed.
- Set the payment status — choose Paid if payment was collected in person, or Pending if the customer will pay later.
- Add admin notes (optional) for internal reference, such as "Phone booking" or "VIP client".
- Click "Create Booking" to save. The customer receives a confirmation email automatically.
Tip: If the customer already exists in your system, start typing their name or email in the customer field. The auto-suggest will populate their details, saving you from re-entering information.
Booking History Tracking
Every booking maintains a complete audit trail of all changes. Open any booking's detail screen and scroll to the Activity Log meta box to see the full history.
Events Tracked in the Activity Log
- •Booking created (with source: frontend form, admin panel, or API)
- •Status changes (e.g., Pending to Confirmed) with timestamp and admin username
- •Payment status updates (e.g., Pending to Paid) with transaction ID
- •Date or time rescheduled (shows old and new values)
- •Staff member reassignment
- •Customer information edits
- •Admin notes added or modified
- •Email notifications sent (with recipient and template used)
- •Cancellation with reason (if provided)
Tip: The activity log is read-only and cannot be edited or deleted. This ensures a tamper-proof record of all changes for accountability and dispute resolution.
Customer Information Management
WP Booking System Pro automatically builds a customer database from booking submissions. Each unique email address creates a customer profile that aggregates all their bookings.
Customer Profile Contains
- • Full name and contact details
- • Total number of bookings
- • Total lifetime spend
- • No-show count and rate
- • Last booking date
- • Preferred services
- • Complete booking history
What You Can Do
- • View all bookings for a customer
- • Edit customer contact details
- • Add internal notes about the customer
- • See payment history and totals
- • Export customer data (GDPR compliance)
- • Delete customer data on request
- • Link to WordPress user account (if applicable)
Access the customer list from WP Booking System → Customers. Click any customer name to view their full profile and booking history.
Payment Method Tracking
Every booking records which payment method was used, making it easy to reconcile transactions across your payment gateways.
Stripe
Credit/debit cards, Apple Pay, Google Pay. Booking stores the Stripe Payment Intent ID for easy lookup in your Stripe dashboard.
Tracked data: Transaction ID, last 4 digits of card, card brand (Visa, Mastercard, etc.), charge amount, and currency are all recorded.
PayPal
PayPal balance, credit/debit cards through PayPal checkout. Booking stores the PayPal Transaction ID.
Tracked data: PayPal payer email, transaction ID, payment amount, and PayPal fee are recorded for reconciliation.
Bank Transfer
Manual bank transfer for multi-attendee and enterprise bookings. Admin must manually mark payment as received.
Tracked data: Reference number, transfer date, and admin notes are available for tracking.
Pay at Venue
Customer pays in person at the time of the appointment. Common for walk-in or cash-based businesses.
Tracked data: Admin marks as Paid after collecting payment. Supports cash, card reader, or other in-person methods.
Rescheduling Functionality
Rescheduling allows you to move a booking to a different date or time without cancelling and re-creating it. All booking data, payment information, and customer details are preserved.
How to Reschedule a Booking (Admin)
- Open the booking from the list by clicking Edit.
- In the Service Details meta box, click the "Reschedule" button next to the date/time fields.
- A calendar widget appears showing available slots. The original slot is highlighted in yellow for reference.
- Select a new date and time. The system checks for conflicts with existing bookings and staff availability in real time.
- Optionally add a reason for the reschedule in the notes field.
- Click "Confirm Reschedule". The old time slot is freed and the booking is moved to the new slot.
- The customer automatically receives a reschedule notification email with the updated date and time.
Customer Self-Service Rescheduling
If enabled in settings, customers can reschedule their own bookings via a link in their confirmation email. You can configure:
- • Minimum notice period: How far in advance a customer must reschedule (e.g., 24 hours before the appointment)
- • Maximum reschedules: Limit how many times a single booking can be rescheduled (e.g., 2 times)
- • Reschedule window: How far into the future a booking can be moved (e.g., within 30 days)
Multi-Attendee Bookings
When a service has multi-attendee enrollment enabled, bookings include additional data fields for group registrations. Here is how these bookings appear and are managed from the admin side.
Attendee Count
The booking list displays an attendee count badge next to the customer name for multi-attendee bookings (e.g., "3 attendees"). In the booking detail screen, a dedicated Attendees meta box lists every registered person with their:
- • First name and last name
- • Email address
- • Pricing tier (Tier 1 for primary, Tier 2 for additional attendees)
- • Individual price paid
Admins can add or remove individual attendees directly from this meta box via AJAX without reloading the page. The total price recalculates automatically.
Company Name & Tax ID
Multi-attendee bookings can include company registration details:
- • Company Name: The organization making the group booking. Displayed in the booking list as a secondary line under the customer name.
- • Tax ID: Company tax identification number. The system performs automatic duplicate detection — if the same Tax ID has already been used for the same service and date, the booking is blocked to prevent double registrations.
VAT Exemption
Customers can check the "VAT Exempt" box during booking if their organization qualifies for tax exemption. When enabled:
- • VAT is removed from the total price in real time
- • The booking detail screen shows a "VAT Exempt" badge
- • Invoices and receipts reflect the exemption
- • The admin can toggle VAT exemption on or off from the booking edit screen
Learn more: For complete setup instructions including tiered pricing configuration, email templates, and bank transfer setup, see the Multi-Attendee Enrollment documentation.
Best Practices
Daily Workflow
- Review and confirm pending bookings each morning
- Check for upcoming appointments in the next 24 hours
- Mark completed appointments at the end of each day
- Flag no-shows promptly for accurate reporting
- Reconcile payments weekly with your gateway dashboard
Staying Organized
- • Use admin notes to record phone call summaries
- • Set up email notification templates for each status change
- • Enable auto-confirm for low-risk services to save time
- • Enable auto-complete for past bookings to keep your list clean
- • Export booking data monthly for backup and reporting