Email Templates
Customize every email your booking system sends
Overview
WP Booking System Pro includes a powerful email template editor that gives you full control over every automated email your booking system sends. From booking confirmations to follow-up messages, each template can be personalized with dynamic variables, styled with the built-in WYSIWYG editor, and tested before going live.
Tip: Navigate to WP Booking System → Settings → Email Templates in your WordPress admin to access the template editor. All seven template types are listed in the sidebar for quick switching.
Email Template Types
WP Booking System Pro ships with seven distinct email templates, each triggered automatically at the appropriate moment in the booking lifecycle. You can enable, disable, and fully customize each one independently.
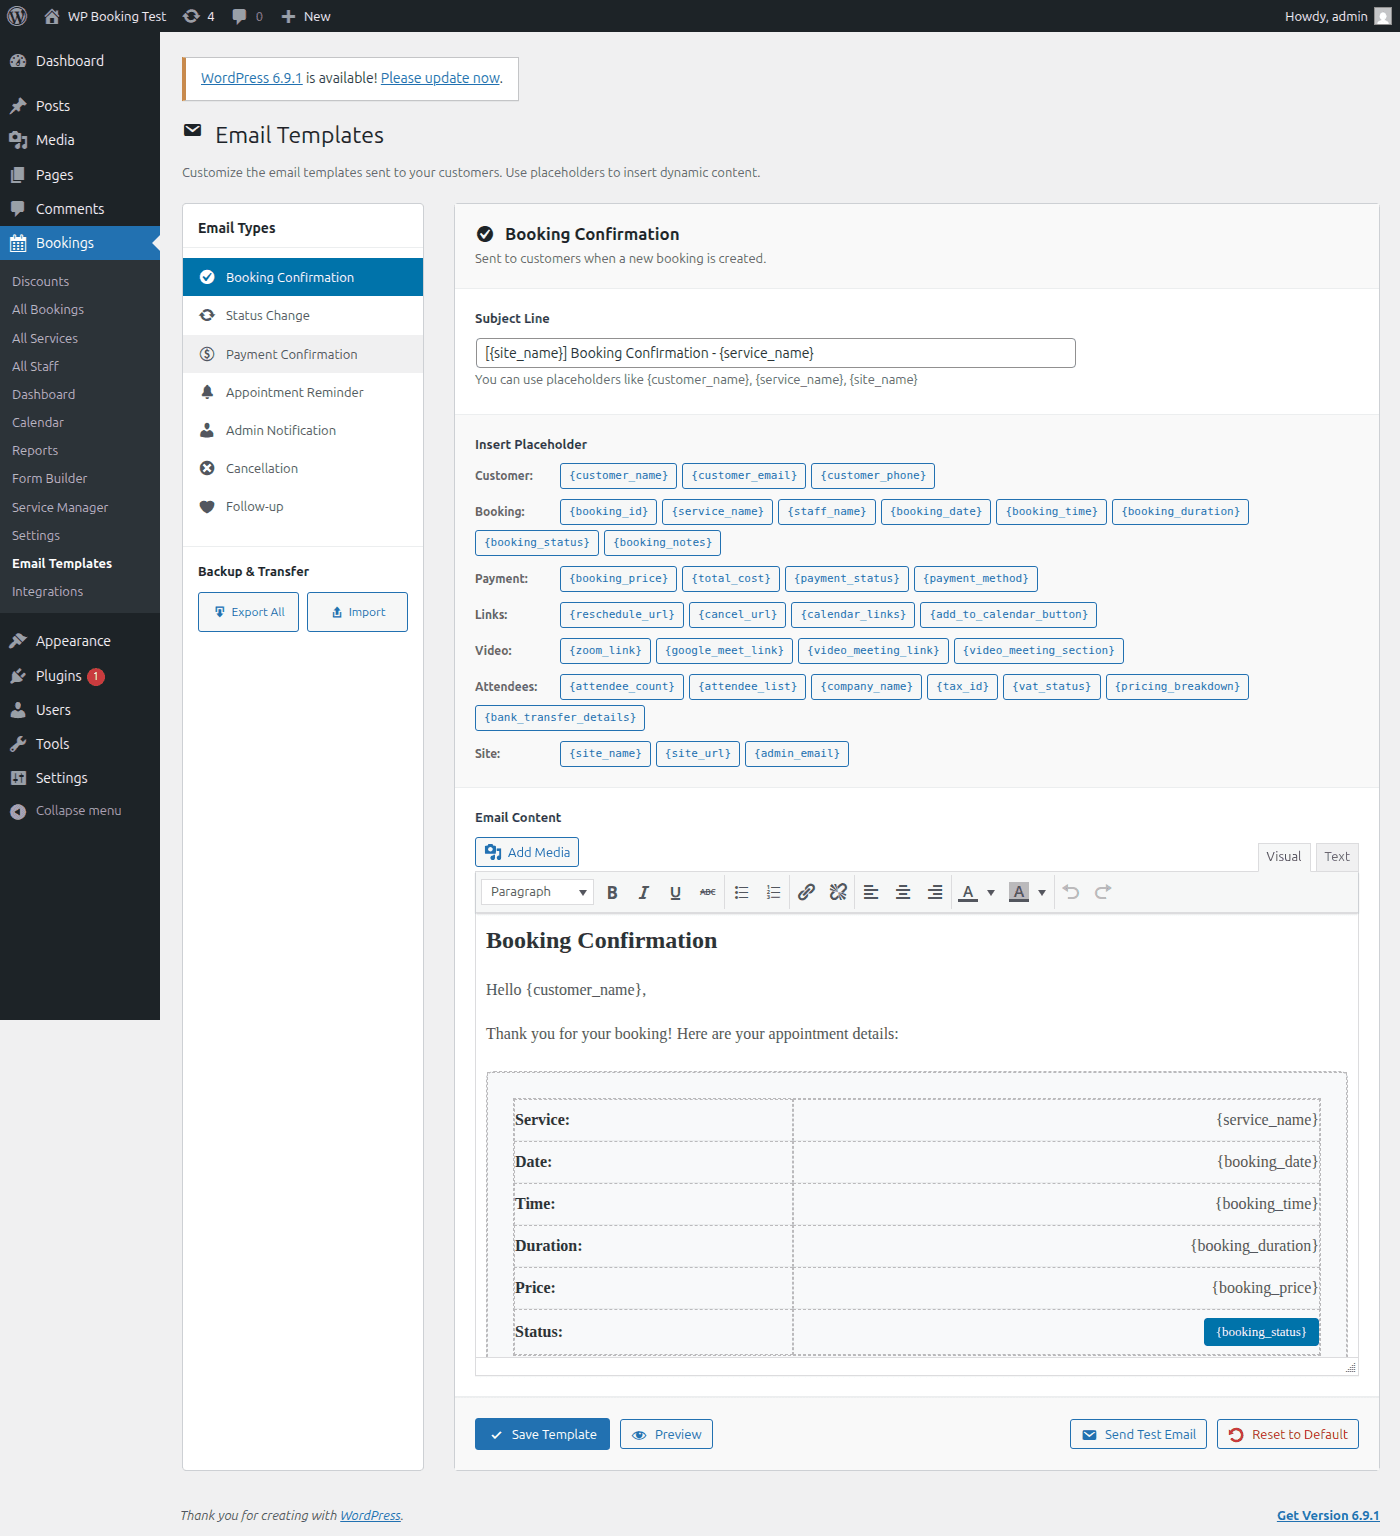
1. Booking Confirmation
booking_confirmationSent to the customer immediately after a booking is confirmed. This is the most important email in the system — it serves as the customer's receipt and includes all booking details.
When sent: Immediately upon booking confirmation (or after payment is verified, if payments are enabled)
Typical use: Include booking summary, date/time, staff member, payment details, and a link to reschedule or cancel
2. Status Change
status_changeSent whenever an admin manually changes the status of a booking (e.g., from "Pending" to "Confirmed", or from "Confirmed" to "Completed"). Keeps the customer informed about their booking's progress.
When sent: Each time the booking status is updated in the admin panel
Typical use: Notify the customer that their booking has been approved, rescheduled, or marked complete. Use the {booking_status} variable to show the new status
3. Payment Confirmation
payment_confirmationSent when a payment is successfully received and processed. This acts as a payment receipt for the customer and is separate from the booking confirmation.
When sent: After Stripe, WooCommerce, or bank transfer payment is confirmed
Typical use: Show the amount paid, payment method, transaction reference, and remaining balance (if deposits are used). Include {bank_transfer_details} for offline payments
4. Reminder
reminderPre-booking reminder emails sent automatically before the appointment. You can configure multiple reminder intervals (e.g., 24 hours before and 1 hour before) to reduce no-shows.
When sent: Configurable — typically 24 hours and/or 1 hour before the booking time
Typical use: Remind the customer of their upcoming appointment, include location/preparation details, and provide a reschedule or cancel link
Note: Reminders require WordPress cron (WP-Cron) to be running properly. If your site has low traffic, consider setting up a real server cron job for reliable delivery.
5. Admin Notification
admin_notificationSent to the site administrator (and optionally additional email addresses) whenever a new booking is created. Ensures you never miss an incoming booking.
When sent: Immediately when a new booking is submitted by a customer
Typical use: Include the full booking details, customer contact information, and payment status so the admin can review and confirm quickly
Tip: You can add multiple admin email addresses separated by commas in the "To" field. Useful for notifying both the business owner and the assigned staff member.
6. Cancellation
cancellationSent to the customer when their booking is cancelled, whether by the customer themselves via the cancel link or by an admin from the dashboard.
When sent: Immediately when a booking is cancelled by any party
Typical use: Confirm the cancellation, mention any refund information, and invite the customer to rebook using {site_url}
7. Follow-up
follow_upSent after a booking has been completed. Ideal for requesting feedback, sharing a review link, offering a discount on the next booking, or simply thanking the customer.
When sent: Configurable delay after booking is marked as completed (e.g., 1 hour, 24 hours, or 3 days after)
Typical use: Thank the customer, ask for a review, include a rebooking link, or offer a coupon code for their next visit
Template Variables (Placeholders)
Template variables are dynamic placeholders that get replaced with real booking data when the email is sent. Use them in both the subject line and the email body. Click the placeholder buttons in the editor to insert them automatically, or type them manually using the curly brace syntax.
Booking Variables
| Variable | Description | Example Output |
|---|---|---|
{booking_id} | Unique booking reference number | BK-00142 |
{booking_date} | Date of the booking (raw format) | 2026-03-15 |
{formatted_date} | Date formatted per WordPress settings | March 15, 2026 |
{booking_time} | Time of the booking (raw format) | 14:30 |
{formatted_time} | Time formatted per WordPress settings | 2:30 PM |
{booking_duration} | Duration of the service | 60 minutes |
{booking_status} | Current status of the booking | Confirmed |
{booking_price} | Price of the booked service | $75.00 |
{booking_notes} | Customer notes added during booking | First-time visit, prefer gentle pressure |
Customer Variables
| Variable | Description | Example Output |
|---|---|---|
{customer_name} | Full name of the customer | Jane Smith |
{customer_email} | Customer's email address | jane@example.com |
{customer_phone} | Customer's phone number | (555) 123-4567 |
Service Variables
| Variable | Description | Example Output |
|---|---|---|
{service_name} | Name of the booked service | Deep Tissue Massage |
{staff_name} | Name of the assigned staff member | Dr. Sarah Johnson |
Payment Variables
| Variable | Description | Example Output |
|---|---|---|
{payment_status} | Current payment status | Paid |
{payment_method} | Payment method used | Stripe (Visa ending 4242) |
{total_cost} | Total cost including taxes and fees | $82.50 |
{bank_transfer_details} | Bank transfer instructions (for offline payments) | Account: 1234-5678, Ref: BK-00142 |
Other Variables
| Variable | Description | Example Output |
|---|---|---|
{site_name} | Your WordPress site name | Serenity Wellness Spa |
{site_url} | Your website URL | https://example.com |
{reschedule_url} | Direct link for customer to reschedule | https://example.com/reschedule?token=abc123 |
{cancel_url} | Direct link for customer to cancel | https://example.com/cancel?token=abc123 |
Tip: You do not need to memorize these variables. The email editor provides clickable placeholder buttons organized by category (Booking, Customer, Service, Payment, Other). Click any button to insert the variable at your cursor position.
Using the Template Editor
Step 1: Select a Template
- Navigate to WP Booking System → Settings → Email Templates
- In the left sidebar, click the template you want to edit (e.g., "Booking Confirmation")
- The template editor will load with the current subject line and body content
Step 2: Customize the Subject Line
- Click the "Subject" input field at the top of the editor
- Type your custom subject line
- Insert variables as needed — e.g.,
Booking Confirmed: {service_name} on {formatted_date}
Example subject lines:
- •
Your booking #{booking_id} is confirmed! - •
Reminder: {service_name} appointment tomorrow at {formatted_time} - •
Payment received for booking #{booking_id} - Thank you, {customer_name}
Step 3: Edit the Email Body
- Use the WYSIWYG (rich text) editor to compose your email content
- Format text with bold, italic, headings, lists, and links using the toolbar
- Click the placeholder buttons above the editor to insert variables at your cursor position
- The placeholders are grouped by category for easy browsing:
- Booking — ID, date, time, duration, status, price, notes
- Customer — name, email, phone
- Service — service name, staff name
- Payment — payment status, method, total cost, bank details
- Other — site name, site URL, reschedule/cancel links, formatted date/time
- Click Save Template when finished
Step 4: Preview and Test
Always preview and test your templates before relying on them in production.
Preview Email
Click the "Preview" button to see a rendered version of the email with sample data replacing all variables. Check the layout, formatting, and content flow.
Send Test Email
Click "Send Test Email" to deliver a real email to your inbox. Enter a recipient address, and the system sends the template with sample data so you can verify formatting in actual email clients.
Template Management
Reset to Default
Revert any template back to its original default content. Useful if you want to start over or undo extensive changes. Click the "Reset" button and confirm.
Export Templates
Export all seven templates as a single JSON file. This creates a complete backup of your email configurations that you can store safely or transfer to another site.
Import Templates
Import templates from a previously exported JSON file. All seven templates are restored at once. Existing templates will be overwritten, so export a backup first.
Warning: Importing templates overwrites all existing templates. Always export a backup before importing. The import file must be a valid JSON file previously exported from WP Booking System Pro.
Best Practices
Keep Subject Lines Clear and Concise
Include the most important information (booking ID, service name, or action) in the subject line. Aim for under 60 characters to prevent truncation in email clients. Always include at least one identifying variable like {booking_id} or {service_name}.
Include Reschedule and Cancel Links
In confirmation and reminder emails, always include {reschedule_url} and {cancel_url}. This empowers customers to manage their own bookings and reduces the volume of admin support requests.
Test in Multiple Email Clients
Use the "Send Test Email" feature to send tests to Gmail, Outlook, Apple Mail, and mobile clients. HTML rendering varies significantly between email clients, so always verify that your templates look correct everywhere your customers use email.
Use Follow-ups for Customer Retention
Configure the follow-up email with a delay of 24 hours after completion. Include a link to rebook, a review request, or a coupon code for their next visit. This is one of the most effective ways to drive repeat bookings.
Configure Reminder Timing Carefully
A 24-hour reminder gives customers time to prepare or reschedule. A 1-hour reminder serves as a last-minute prompt. Avoid sending more than two reminders per booking to prevent email fatigue. For services requiring preparation (e.g., fasting for a medical appointment), a 48-hour reminder may be more appropriate.
Troubleshooting Email Delivery
Emails Not Arriving
WordPress uses the PHP mail() function by default, which many hosting providers restrict. If emails are not being delivered:
- Install an SMTP plugin (e.g., WP Mail SMTP, FluentSMTP)
- Configure it with a reliable email service (Gmail, SendGrid, Mailgun, Amazon SES)
- Send a test email from the SMTP plugin to confirm delivery
- Then use WP Booking System Pro's "Send Test Email" to verify booking emails
Emails Going to Spam
If booking emails land in the spam/junk folder:
- • Set up SPF, DKIM, and DMARC records for your domain
- • Use a dedicated transactional email service
- • Avoid spam trigger words in your subject lines (e.g., "FREE", excessive punctuation)
- • Ensure the "From" address matches your domain
Variables Not Replacing
If you see raw variable names (e.g., {customer_name}) in sent emails instead of actual values:
- • Verify you are using the exact variable syntax including curly braces
- • Check for typos — variable names are case-sensitive
- • Use the placeholder buttons instead of typing variables manually to avoid errors
- • Ensure the variable is relevant to the template type (e.g.,
{bank_transfer_details}only works when bank transfer is the payment method)
Reminders Not Sending
Reminder emails rely on WordPress cron. If they are not being sent on time:
- • Verify that
DISABLE_WP_CRONis not set totrueinwp-config.php - • For low-traffic sites, set up a real server cron job to hit
wp-cron.phpevery 5 minutes - • Install a cron monitoring plugin to verify jobs are running
Example: Booking Confirmation Template
Below is a sample booking confirmation email template you can use as a starting point. Copy and paste it into the WYSIWYG editor, then customize it to match your brand.
<!-- Subject Line -->
Booking Confirmed: {service_name} on {formatted_date} | #{booking_id}

<!-- Email Body -->
<h2>Hi {customer_name}, your booking is confirmed!</h2>

<p>Thank you for booking with {site_name}. Here are your details:</p>

<ul>
  <li>Service: {service_name}</li>
  <li>Date: {formatted_date}</li>
  <li>Time: {formatted_time}</li>
  <li>Duration: {booking_duration}</li>
  <li>Staff: {staff_name}</li>
  <li>Total: {total_cost}</li>
</ul>

<p>Need to make changes?</p>
<p>
  <a href="{reschedule_url}">Reschedule</a> | <a href="{cancel_url}">Cancel Booking</a>
</p>

<p>See you soon!<br />The {site_name} Team</p>
Your Email Templates Are Ready
Once you have customized and tested your templates, every booking in your system will automatically send professional, branded emails at the right moment. Remember to export your templates as a JSON backup after making changes.
Next: Set Up Coupons & Discounts